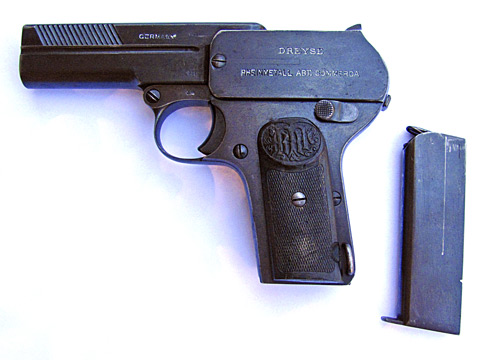
Detailed Disassembly and Reassembly of the Dreyse 1907

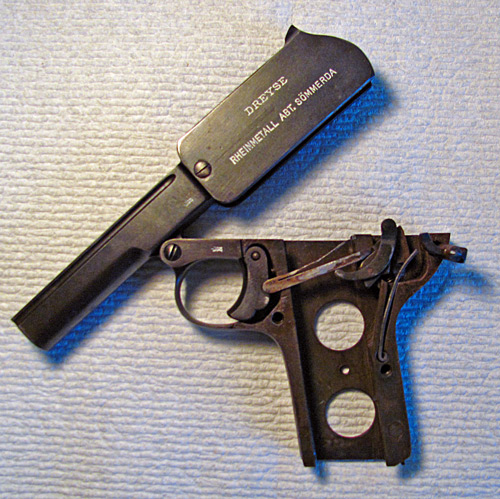
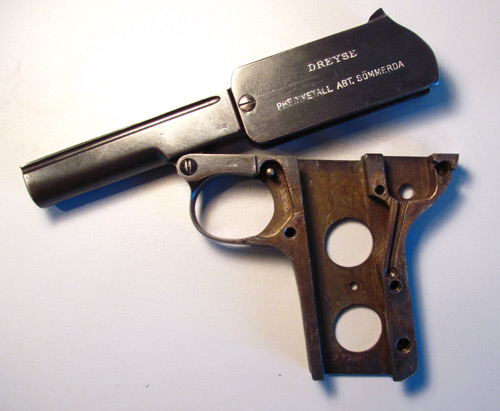
This odd little German pocket pistol was designed to get around John M. Browning's 1899 patent on the slide mechanism used in almost all the familiar semi-automatic pistols. It wasn't designed by our old friend Johann von Dreyse of needle-gun fame, but by Louis Schmeisser of Rheinische Metallwaren und Maschinenfabrik (RM&M) of Sömmerda. RM&M bought the Dreise factory and its famous name.

About 250,000 were produced from 1908 to 1918. There were several variations; changes were made to the cocking serrations, the disconnector, lanyard ring, and the shape of the rear sight. The Dreyse 1907 was used by the German military and police in WWI, and by the end of WWII they were mostly in the hands of local home-guard types. Those guys were disarmed by Allied soldiers, who sometimes "pocketed" these handy little pocket pistols. That's why there are thousands of them in the US, even though they were never imported.

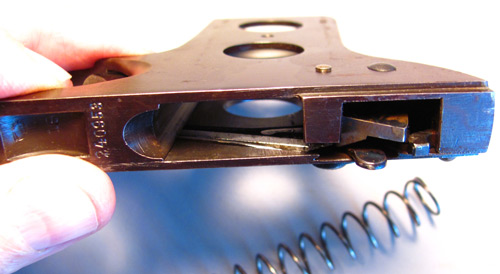
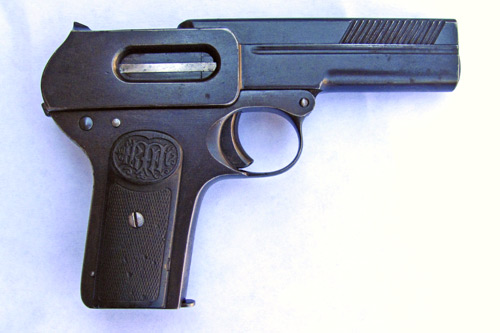
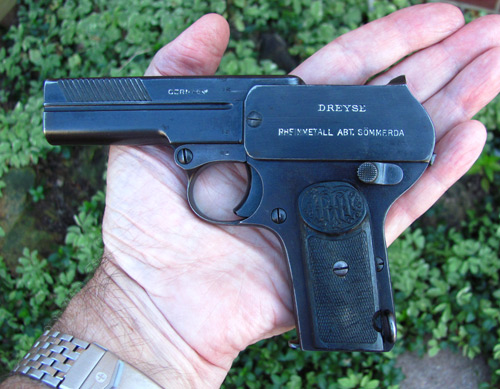
This one is marked 'GERMANY' for export. It was made about 1917.


The Dreyse is about the hardest pistol to field strip I've ever handled because of the strong recoil spring and the awkward barrel bushing catch, but it's not bad if you have the right tools.

Remove the magazine. The heel release is easy to operate because you just pinch with thumb on the release and finger on the magazine floor plate tab.


Steel your nerves and grasp the cocking serrations near the muzzle. Pull back the bolt and check the chamber two or three times to be sure the pistol is unloaded.

We can't disassemble this pistol without pulling the trigger, because the cocked striker blocks the latch. That's because the striker would fall if you opened a cocked pistol. So check the chamber again, point in a safe direction, and pull the trigger. Then press the latch button (on the rear above the backstrap) toward the right and open the frame.


Now we have to deal with the very strong concentric recoil spring and the awkward barrel bushing. There are several bad tools for this job, but I prefer to use a 1/2 x 3/8 copper reducer fitting because it fits the barrel bushing nicely, presses on it all the way around, and isn't hard enough to mar the steel.

The worst thing about this operation is the way parts fly around if they get out of control, so do what you must to keep things in hand.

The barrel bushing hooks into a slot in the bolt extension, or what looks like a slide. With the frame unlatched and OPEN, use your tool to press the bushing in, and let the bolt extension (the part with the grasping serrations) separate from the upper frame and disengage from the hook on the barrel bushing. Then keep the bushing under control while you let the recoil spring relax.

With luck, you'll have the bushing and bolt extension separated from the upper frame, and you won't have any injuries or broken windows.


Pull out the recoil spring, and tip the bolt and bolt extension to clear the ejector (visible here through the ejection port) and lift them out of the upper frame.


There are several screws with narrow slots. Use good quality screwdrivers that fit the slots exactly to avoid marring the screws. I did not remove the screw that holds the barrel assembly to the frame because it appeared to have been mushroomed a bit to prevent it from falling out.

First, remove the grips.


Turn the safety to this position, and with a small tool, slightly relieve the pressure of the safety spring on the safety shaft, and then work the safety out.


Remove the side plate to expose the lockwork.


Here you see the trigger, trigger bar, disconnector, sear, safety spring, and latch. This pistol is a marvel of Teutonic engineering--each of its 39 parts has one and only one function.


Lift out the trigger bar, disconnector, and the latch with its spring.


The trigger can be started out by pushing from the other side.


Then you work out the trigger and its strong spring together. This strong spring appears to be part of the reason for the very heavy trigger pull on my pistol.


Pry out the safety spring...


and lift out the sear with its strangely long spring. Note how the spring engages with a bump on the bottom of the sear.


A pin holds the magazine catch. Push it partly in...


and then hold the magazine catch while you remove the pin from the large end.


This is as far as I want to disassemble the frame. The ejector and the ejector screw in the top part of the frame need not be removed, and the screw that holds the upper frame to the lower doesn't want to come out.

Now we start on the bolt.


Here are the bolt (upper right) and the bolt extension, or cocking bar (lower left), upside down on the table, to show the extractor. Lift out the extractor.


Remove the bolt face by rotating it until it clears the retaining slot milled into the bolt extension.


With the bolt face removed, the striker, striker spring guide pin, and striker spring come out. Don't try to remove the striker guide that's screwed into the rear of the bolt. That just wouldn't be right.

That completes disassembly.


Reassembly

Reassembly is pretty much the reverse of disassembly. Here are a few tips.

Remember, if you work on your own gun, I don't accept responsibility if things go badly . I don't claim my method is correct. All I can say with assurance is that my pictures are pretty good.


There are five springs in the internal works. Here they are next to the parts they work with, so you can tell them apart.


This is how the sear spring looks when properly installed. Why is it so long, and why is it sort of twisted when installed? Who knows?


Here's how the lockwork looks when assembled. The safety will go in later. It operates by blocking the sear from tipping back.


Just for illustration, this is how the trigger bar and disconnector fit with the side plate. Keep this in mind when you put on the side plate.


Gently fit the side plate in place. Make sure the delicate trigger bar spring fits into the cutout in the side plate. Be SURE it doesn't stick out into the magazine path, or it will be damaged by the magazine.


When the side plate is installed, you'll see the safety spring through the safety hole.


Through the safety hole, pry the safety spring forward so you can get hold of it from the top with a small tool.


Hold the safety spring forward while you work in the safety as shown.


Notice how the bolt has to be tipped behind the ejector before it will slide into the upper frame. We also see the sturdy curve at the back of the upper frame and under the rear sight that absorbs the impact of the bolt extension. The Dreyse 1907 is strongly built.


There's a lot of recoil spring that has to be pushed in before the hook on the barrel bushing can engage with the slot in the bolt extension.


The 1/2 x 3/8 copper reducer is handy for installing the barrel bushing because the fat end helps keep it from tipping while you press down on it. With the frame unlatched and OPEN, use your copper tool to press in the barrel bushing and get its hook into the slot in the bolt extension.


Your marvel of Teutonic design and engineering is again assembled. This ugly little .32 auto is nicely machined and lots of fun to shoot.


Other Curio & Relic Firearms


© 2016 Porter Rockwell

Valid HTML 4.0 Transitional     Valid CSS

AmazingCounters.com